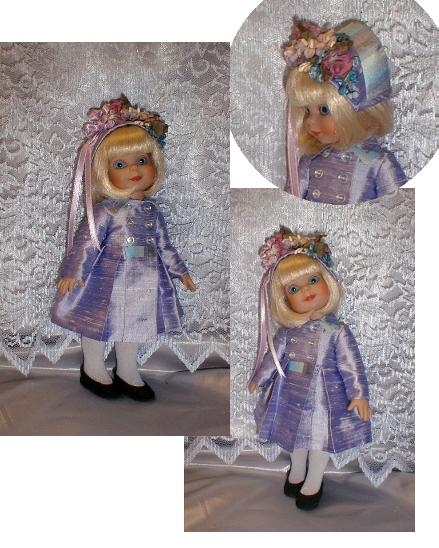
Perfect Patterns Style 73
Coat and Bonnet for a Little Girl Doll
~Lesson 6~
Bonnet
With photos and instructions by Marsha Olson
(printout is 7 pages)
You will need pattern pieces 10, 11, 12, and 13.
Press iron-on craft interfacing (very stiff) to your fabric for the crown and side crown before cutting.
Cut the Bonnet Crown (10) and Side Crown (11) one each of your fabric and lining.
The Bonnet Trim (12) and the Bonnet Edge Trim (13) will be cut from your constrasting trim fabric.
1. A. Staystitch along the seamline on the round of the Crown (10).
B. Clip and press the seam to the inside along the stitching line.
2. Staystitch the notched edge of the Side Crown (11) and clip.
3. Cut the Bonnet Trim (12) piece on the bias. Press the two long edges under 1/4". Pin the strip in place with the ends at the corners and the middle point of the trim in the center of the side crown. Stitch in place by hand or topstitch by machine. Cut the corners of the trim to match the bonnet. The trim piece, because it is cut on the bias, can be curved and pressed into the correct shape before sewing it on.
4. Using the stitched line as your guide, press the edge of the side crown to the inside..
5. Slip stitch the two pressed edges of the crown and the side crown together, easing as needed.
6. Staystitch and clip the long notched edge of the side crown lining.
7. Right sides together, pin the side crown lining to the crown lining and sew the two pieces together.
8. Wrong sides together, pin the lining into the bonnet, matching the seams and corners. Sew the two pieces together all around the raw edges 1/8" from the edge.
9. Cut the Bonnet Edge Trim (13) on the bias. Press the two long edges in 1/4".
(bias tape may be used in place of self made trim)
10.
Start and end at the bonnet back seam rather than the center back, this makes the seam less visible.Fold the trim evenly around the edge of the bonnet. Slip stitch in place on the outside, mitering at the corners OR round off the bonnet corner slightly and continue without mitering. Keep the trim folded around the edge as you work, it will be easier to sew it evenly.
11. When the strip meets, overlap slightly and trim the excess down to 1/4" that can be turned under and sewn in place. Turn the bonnet inside-out and slipstitch the inside edge of the trim in place.
11. Cut a piece of 1/8" white elastic 2 1/2" long. Fold one end under 1/4" and sew the folded loop to the inside of the bonnet corner slightly back from the corner about 1/8" with the raw end of the loop hidden. Do the same on the other side so the elastic streches under the chin of the doll when the bonnet is on. Trim off the elastic ends.
12. Make a bow of ribbon and tack to the center top of the bonnet.
End Style 73 Lesson 6
End Class 73
Option: The front pleats can be pressed in for a more tailored look.